Let AskSARA guide you

If you are a member of the public looking to access our rapid self-assessment tool, AskSARA, please contact your local authority to access this service.

If you are a local authority or organisation wishing to enquire about obtaining a license for your residents, please contact us at enquiries@livingmadeeasy.org.uk, where we will be happy to assist.

To see a list of current Local Authority & HSCP Licensees, click the button below.

View Licensees

Wall and floor/ceiling mounted rails

This section includes grab rails that are secured both to the wall. and the floor or ceiling They are available in a range of sizes, and the weight they can take depends on the strength of the wall.  Some rails may be brightly coloured, which may help people with memory loss to identify them. 

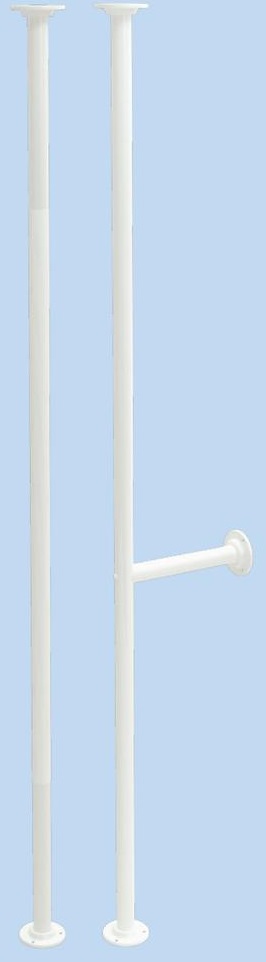
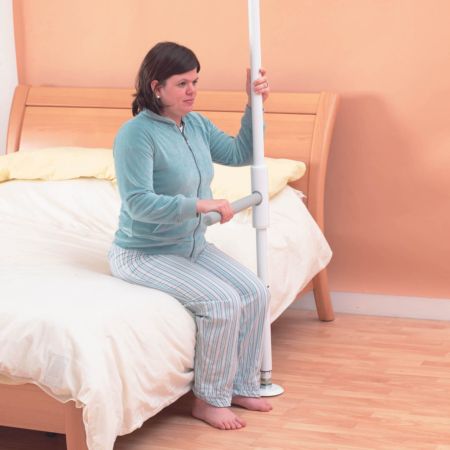
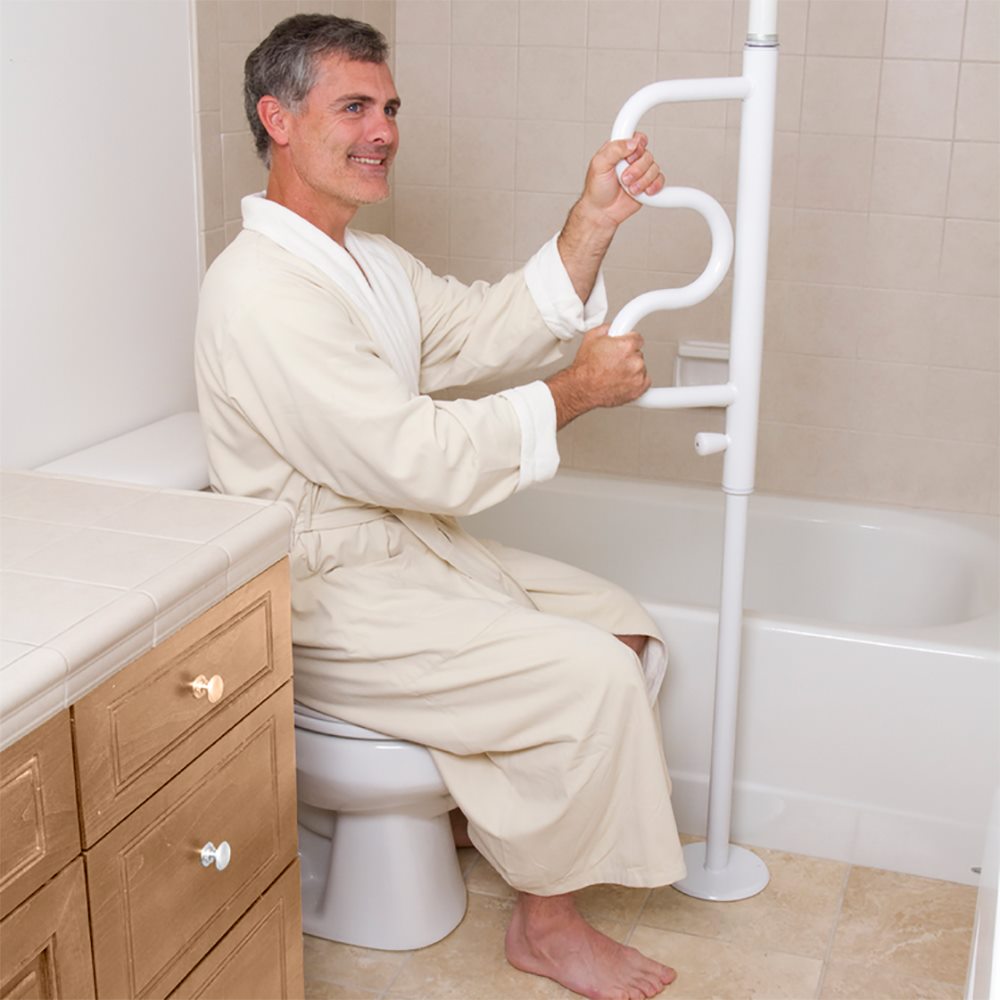
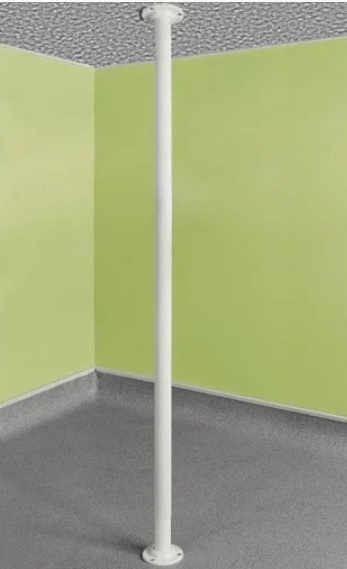
Floor to ceiling poles and rails are attached to both the floor and ceiling, and may help the user to transfer to and from a bed, sofa or toilet. Some may have a horizontal support bar. They may be positioned close to the tap end of the bath to provide a rail and pivot for a bather stepping into the bath or to use from a sitting position, for example when using a bath board. Alternatively, they may be positioned at the bedside.

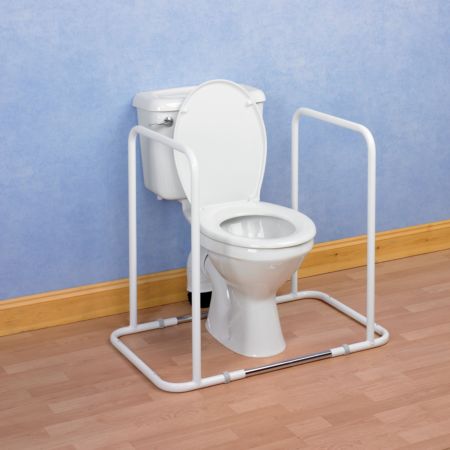
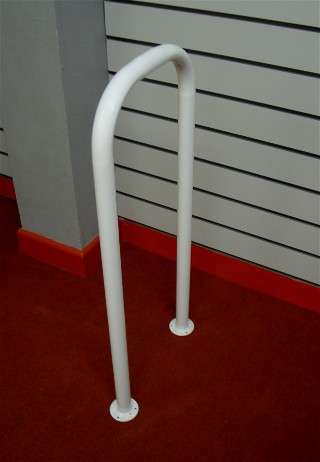
Floor mounted toilet rails are fixed to the floor beside the toilet. They can be used individually to the left or right of the toilet or in pairs on both sides of the toilet. They may be useful beside a toilet, or bed to provide support and stability when standing.  

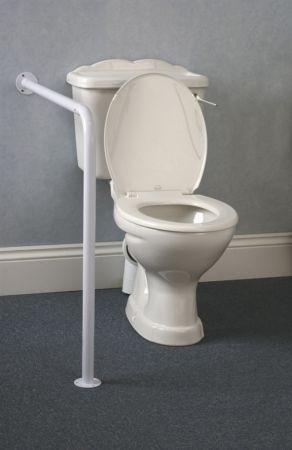
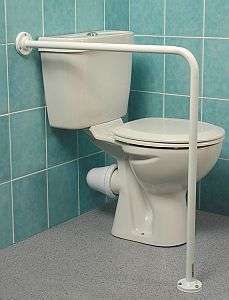
Wall-mounted and floor-fixed toilet rails are right-angled rails which are fixed to both the wall at the back of the toilet and the floor beside the toilet. They can be used individually to the left or right of the toilet or in pairs on both sides of the toilet. They may be useful beside a toilet, bath or bed to provide support and stability when standing.

Sort by:
FILTERS
LOADING...
Surrey Toilet Surround Rail
Toilet surround frame. Comprises: adjustable width plastic coated steel frame; rectangular tubular base which lies directly on floor surrounding the t...
Add for comparison
Advantage Static Floor Mounted Grab Rail
Upright floor-fixed pole with support rail to facilitate standing and transfers. Does not require ceiling mount. Support rail is lifted to turn and lo...
Add for comparison
Vertical Grab Pole
Vertical grab pole. Comprises: welded flanges; loose top flange can be cut to length; fixing holes to fit size 8 screws. Options: ribbed grip.
Add for comparison
SuperBar
Floor to ceiling pole constructed of heavy gauge steel. Secured by a jack screw expansion with rubber protection pads to avoid marking the floor or ce...
Add for comparison
Security Pole
Floor to ceiling pole which is tension mounted using a wrench which is supplied. An optional additional grab bar can be attached. The grab bar is curv...
Add for comparison
Akw Floor To Ceiling Support Rail
Floor to ceiling support pole. Comprises: steel; PVC ribbing; polycoated fixing plates; three fixing points and wall support.
Add for comparison
Ringwood Wall To Floor Grab Rail
Right angled, wall-mounted and floor-fixed toilet rail. Comprises: plastic coated tubular steel with fixing plates.
Add for comparison
Impey Floor To Wall Pole
Floor to wall pole. Comprises: mild steel construction with polyester finish and moulded ribbed surface; flanges with three holes.
Add for comparison
Impey Floor To Ceiling Pole
Floor to ceiling pole. Comprises: mild steel construction with polyester finish and moulded ribbed surface; flanges with three holes; can be trimmed ...
Add for comparison
Floor To Wall Toilet Support Rail
Right angled, wall-mounted and floor-fixed toilet rail. Comprises: circular end plates with three holes for fixing.
Add for comparison
Floor To Floor Hand Rail
Floor-fixed grab rail. Comprises: plastic coating; steel; loop-shaped; screwed to floor.
Add for comparison
X CLOSE
Choosing and fitting grab rails

Introduction

Grab rails can be positioned anywhere in and around the home to provide support. Conveniently placed rails will provide help in four ways:

  • to push or pull against when standing up
  • to provide a steadying support while sitting down
  • to provide a firm grip when transferring from one position to another
  • for balance when standing and carrying out an activity, like walking or negotiating the stairs.

Most grab rails are attached to the wall, or from wall to floor, although floor to ceiling rails are available. Sometimes a combination of vertical and horizontal rails can be helpful. The type and positioning required will depend upon your grip and arm strength and the material used in the construction of the home.


Types of grab rail

There are many types of grab rail. The main types are briefly introduced below, before going into greater detail about grab rails and their use in specific areas of the home.

Straight rails

Straight rails are wall-fixed rails which run in one direction only. They can be fixed in a horizontal or a vertical position, or at an incline or angle.

Horizontal rails may help when pushing up from sitting and provide support when lowering, e.g. on to a toilet. Most people find it easier to push down on a rail rather than pull on one, so horizontal rails are more commonly used.

Vertical rails may assist when pulling up into a standing position or for just maintaining balance.

Rails set at an angle can help a person who needs a steadying support - e.g. to stand from a bath board to shower. The rail can be placed at an angle of 45 degrees up and away from the user. This keeps the wrist in a neutral position. It is not necessary to lean far forward to grasp the rail at the lower end and the hand can travel up the rail to maintain the support once the person is standing.

Rails set at an incline (fixed at a slight angle to the horizontal) may assist someone with weak or painful arms or wrists to support his/her forearm on the rail whilst pushing up, thus spreading the body weight over a larger area.

Pre-formed angled rails and right angled rails

These are wall-fixed rails with an in-built angle.

The lower portion is usually set horizontally and acts as a forearm support. This enables the user's body weight to be distributed through his or her forearm which may be helpful for someone with painful hands or wrists.

The top section provides an angled or upright handhold.

Cranked or offset rails 

Cranked or offset rails  are wall-fixed rails which have been designed to fit to frames and spaces to allow the user to step up to and through a doorway or space without releasing grip on the rail.

Floor to ceiling rails 

Floor to ceiling rails are vertical rails which are attached to both the floor and the ceiling. They can be held at any point up the bar for general support and can be useful in the process of standing up/sitting down.

System rails 

System rails are rails which can be put together to provide customised support over a large area, e.g. round a bathing area. They attach to the walls and can be cut or ordered to the required length.

Bends and angles can be fitted where required.

Drop down rails 

These are most often seen next to toilets.

They are fixed to the wall or to the floor behind the toilet and can fold down to a horizontal position alongside the toilet.

Some have a support leg which rests down on the floor when the rail is horizontal. Some models provide a single horizontal rail which provides support at one height; others consist of a looped rail which provides two alternative gripping positions. Some of these rails have a built-in toilet roll holder.

Rails that can be lifted up and out of the way can be useful for wheelchair users and people who use a hoist.

The material and finish of the grab rail

Grab rails may be made of:

  • plastic
  • stainless steel
  • steel
  • wood
  • brass.

Plastic rails may be reinforced with a metal core. Wooden rails have metal brackets at each end for attachment to the wall.

The finish of the rails may be important from an aesthetic point of view and also for the grip surface it provides.

A polished or chrome finish is attractive and hard wearing but can be quite slippery to hold, especially when hands are wet.

An epoxy, paint or plastic finish provides a warmer feel to rails, is hard wearing and will reduce the effects of condensation. A choice of colour allows for a colour contrast with the wall for users with low vision or for co-ordination of bathroom accessories.

A high contrast finish may be helpful if you have low vision - choose grab rails in a colour that contrasts with the wall it is to be installed on.

A slip resistant, knurled, ribbed or fluted finish is a moulded, coated, textured surface which provides extra grip even when wet. This finish may be uncomfortable for those with sensitive hands.

Positioning of grab rails

Correct positioning of grab rails is important to ensure that they provide the support, where necessary, to perform specific tasks. Although there is published guidance for the positioning of rails, you will also need to be guided by:

  • your own requirements
  • the support you require
  • your height and weight
  • the amount of mobility and strength you have in your hands, arms and shoulders.

There are a number of published documents which can help in the positioning of rails. These are intended to give generic guidance to property developers or housing associations, but the principles and advice may be useful as a starting point. If you are installing grab rails into your current home, the ideal position for you will depend on your own unique needs, preferences, measurements and home environment:

In the bathroom

Grab rails in a bathroom should have a ribbed or textured surface to give extra grip when wet.

Horizontal and inclined rails

When standing from a sitting position in the bath you may find it helpful to hold one horizontal wall-fixed grab rail (placed above the bath) with one hand and use the outer rim of the bath with the other hand to push against. There needs to be a 50-60mm clearance between the wall and all handrails.

A rail can be fixed horizontally to the wall 75-100mm above the bath rim (see dimension c in diagram). It should start 200mm from the tap end of the bath (dimension a) (COT 2006 p13, H M Government 2015, p58, diagram 26).

Part of the rail can be fixed at an angle of 13° upwards towards the head end of the bath to provide an inclined support.

The horizontal rail can be used in combination with a bath board. The user may benefit from holding the rail while they sit on the board, then turn and lift their legs in and out of the bath

Vertical rails

When stood in the bath - A rail (at least 500mm long) can be fixed vertically on the wall, 600mm from the tap end of the bath (dimension b in above diagram), with its lower end 200mm above the bath rim (COT 2006 p13, H M Government 2015, p58, diagram 26). This is most likely to be of use when stood in the bath (perhaps whilst showering) or when standing from a bathboard over the bath.

Transferring into the bath - A rail which attaches to both the floor and the ceiling on the outer edge of the bath may provide support when the person is turning round to step in or out of the bath. It is recommended that it should be sited 400mm from the tap end of the bath where it can be reached from a sitting position in the bath. However, its position is likely to be in the way of someone using a bath board, or bath transfer bench, when they swing their legs in and out of the bath. These rails should be fitted by experienced installers, as they take a lot of weight and ceiling fixation can be complicated.

Alternatively, if there are no obstructions outside the bath (e.g. the sink or toilet) a vertical grab rail could be installed on the wall at the tap end of the bath. This is useful when stepping in and out of the bath and also to hold onto if standing to shower.

The rail should be mounted at a height that the user can comfortably reach whilst stood both from outside the bath and from in the bath.

Bath side rails

Floor-mounted - These are screwed to the floor and also clamp onto the side of the bath. They can be adjusted to the thickness of the bath sides and some models are adjustable in height. A vertical loop projects above the bath's sidewall and is held when stepping in and out of the bath. The fixings need to be checked on a regular basis and tightened when necessary. Side rails cannot be used in combination with a bath board or bath transfer bench, as they will get in the way when they swing their legs in and out of the bath.

Bath-mounted - These only clamp onto the side of the bath and can be adjusted to the thickness of the bath sides. Some models are adjustable in height. As with the floor-mounted bath side rails, a vertical loop projects above the sidewall. Again, they cannot be used in combination with a bath board or bath transfer bench.

As these rails attach solely to the bath itself great care needs to be taken to ensure that the fixing mechanism - usually a screw system - remains secure. This needs to be checked on a regular basis and tightened when necessary. They are not recommended for attaching to a plastic or acrylic bath as there is a possibility that the surface may crack.

If possible, rails should be both bath- and floor-fixed for full stability.

Cross-bath rails

These fix to the wall behind the taps and rest on the bath rims. When sitting in the bath, the rail will be directly in front of the person at about chest height. In this position it will provide stability whilst in the bath. The rail should only have downward pressure applied so the weight is taken by the bath rim, it is not designed for the user to pull on to sit down or stand up from the base of the bath (Pain et al 2003).

Ensure that the wall is strong enough to take the weight of this type of rail. Care should be taken that the user never bends down underneath the rail (e.g. to reach their feet) when sat in the bath as they could trap their head under the rail.

Tap-fixed rails

These also rest on the bath rims but clamp around the bath taps and are therefore only as strong as the tap fixtures. Taps are not designed to withstand a full body weight pulling against them. The rail should only have downward pressure applied so the weight is taken by the bath rim - it is not designed for the user to pull on to sit down or stand up from the base of the bath (Pain et al, 2003). These rails fold down to rest on the bath rim and can be folded up against the wall when not required.


In the shower

The following is general guidance. When an individual user is known, personal factors such as the height of the person should be given priority.

Horizontal rails

Drop down or fixed rails attached either side of the shower seat can help to prevent somebody sliding off a wet slippery seat. A rail can be fixed on to the wall at the side of the shower seat, approximately 200mm above the height of any seat. This may be used for help when standing and may assist wheelchair users to transfer across onto the seat from a wheelchair (H M Government 2015, p54, diagram 22). A drop down rail can be fixed on the rear wall, to drop down on the opposite side of the shower seat, with its top rail level with the wall-fixed rail.

In shower cubicles it may be useful to have an additional horizontal rail fixed on the wall opposite the shower seat at a height of 1m from the ground, if it can be easily reached from the seat.

Vertical rails

A vertical rail at least 500mm long can be fixed at the entrance to the shower compartment for use when stepping in and out of the cubicle. The rail should be mounted at a height that the user can comfortably reach whilst stood both from outside the cubicle and from in the cubicle.

Vertical rails can be installed on a wall, if present, opposite a shower seat. The lowest fixing should be fixed 800mm above floor level. However, the distance between the front of the seat and the rail must be less than 550mm if it is to be used successfully. If it is too far away, there is a risk of falling forward.


In the toilet

As the options below illustrate, there are many different types of equipment available to assist in transferring on and off the toilet. It is important that you select the equipment that is safe and appropriate for you, which can be influenced by many factors - for example, some equipment may not fit if there are pipes running along the wall at the back of the toilet. Raised toilet seats vary in their maximum user weights and grab rails may not be appropriate if the wall is too far from the toilet. We therefore recommend you arrange an assessment with an appropriate health care professional to discuss your difficulty standing and / or sitting on the toilet.

Grab rails by the toilet are often fixed to the wall alongside the toilet, but if this is not possible (due to the toilet being too far from the wall or a partition wall or a radiator being in the way for example), then a drop down rail that extends from the wall behind the toilet could be used (see below).

Straight grab rails

As a general guide there are two options for wall mounted rails by the toilet. If you have the same strength on both sides of your body it may be a good idea to have supports fixed on both sides of the toilet so that you can use both arms.

Using one rail: The rail is fitted starting at a point approximately 25mm forward of your knee and approximately 50-70mm above your elbow (when seated on the toilet with your arms down against your side), at an angle running at 45 degrees forwards and upwards away from you. This may help you to support the weight of your arm whilst pulling with your hand higher up the rail. See above diagram.

An angled rail may be useful in this situation, to provide the same grip, but with support for the forearm. The angle of the rail would be sited at the same starting point as the straight rail, approximately 25mm forward of your knee and approximately 50-70mm above your elbow (when seated on the toilet with your arms down against your side).

Using a combination of two rails

  • 1. A vertical rail for support when standing from the toilet (this can provide a hold for pulling up from if you have strong upper limbs). The lowest point of the rail is sited approximately 150–190mm in front of the knee while seated on the toilet (approx 300mm in front of the edge of the toilet pan) and 50–70mm above the inside of the elbow crease. Part M of the Building Regulations suggests that the rail should be at least 600mm long and can be fixed to the wall at a height of 800mm above the floor. If you place your hand where the rail would be, you can check that the position is correct for you, and that the rail is sufficiently far forward to maintain a stable position once standing.
  • 2. A 600mm long horizontal rail 680mm from the floor beside, and extending in front, of the toilet pan for use when sitting down on the toilet. This rail can be horizontal or set at an angle of up to 15 degrees. Alternative suggested measurements are a minimum 500mm long rail, at a height of 600mm from the floor, with the rear fixing 400mm from the wall at the rear of the toilet.

Before fitting the rail/s, sit on the toilet and check you can reach the points where you intend to install them. Check the distance between the toilet pan and the side wall. If you have to lean sideways to reach the rail, it may not provide appropriate support. In this case a drop down rail fitted to the back wall, a wall to floor rail or a toilet surround frame may be more appropriate. The measurements are a general guide only, the ideal location of the rails will depend on your individual size, reach and toilet location.

If you wish to use the toilet standing, then a vertical rail placed just in front of your knuckles when your arm is held at a right angle may steady you.

Drop down rails can be used where there is no adjoining wall next to the toilet.

A vertical rail in this position can also be useful to steady yourself as you manage your clothes.

Drop down hinged rails

These rails are useful when there is no suitable wall on which a standard grab rail can be fixed, or where space is a problem. In areas where there is a wall on only one side of the toilet, they can be used in combination with a fixed rail to provide support on both sides, but can be folded up out of the way to allow access for a wheelchair user or helper. They may be wall-mounted (at the back of the toilet) or floor fixed if the supporting wall is not strong enough.

These provide a horizontal bar in their lowered position. They should be fitted at waist/elbow level and approximately a fist width away from your thigh when sat on the toilet.

Some hinged wall-mounted rails can be supplied with a support leg which rests down on the floor when the rail is horizontal, transferring some of the load from the wall to the floor.

Wall to floor rails

These are static right-angled rails that attach to the wall behind the toilet and the floor in front of it. Like hinged drop down rails they are useful for providing support and stability where there is no adjacent wall but they cannot be lifted back out of the way.

Toilet surround frames and toilet seats with frames

If there are obstructions beside the toilet, such as a radiator, or the walls are not suitable for installing rails, you will need to look at alternative kinds of support.

Toilet frames are designed to provide horizontal support for pushing up from a toilet, or for steadying the body when lowering onto a toilet. The frame, which stands over the top of the toilet, can either be free standing or fixed to the floor.

It is essential to fix it to the floor if you have poor balance or co-ordination, or you push down more heavily on one side than the other.

Rails for stairs and corridors

Long handrails

Staircases usually have a handrail on one side, although this may not extend to the full length of the staircase. Most DIY stores sell handrails which can be used to extend the existing handrail all the way up the staircase if it is required. Adding a handrail to the other side of the staircase will provide more support where needed. Long lengths of rail are available and may also be installed along corridors.

A wide range of finished hand rails are available from DIY chains for you to choose from. A plain 50mm mop head cross section softwood rail may be used.

It is recommended that it is run continuously from the bottom to the top of your flight of stairs, including going around the edge of any intervening landings and across window openings. The handrail should be allowed to continue past the top and bottom steps by 300mm.

The height will depend on your needs, often at the same height as an existing banister rail. This is usually between 900-1000mm above the pitch line of the stairs.

The handrail should have a fixing at least every 1000mm and no more than 150mm from each end. It may require mounting on a pattress or backboard (see 'Fixing grab rails' below) which is then secured to the wall. 

Newel rails

Newel rails are designed to turn through 90o around the newel post (the upright post of the stair banister). They provide a continuous grip as the user reaches the bottom or top of the stairs and turns the corner. They are available in a range of sizes.

Please note that left turning and right turning Newel rail models are available. Which one you require depends on which way your staircase turns after the newel post.

Grab rails at entrance to a property

Grab rails at a property entrance may be installed to assist you when ascending or descending steps to enter your home.

Standard straight metal or plastic grab rails can be used but offset/cranked rails are also often used. The offset angle is designed so that you can step up to and pass through the doorway without releasing your grip on the rail. Be careful to place the rail where it does not block access to the door handle or lock.

The ideal height for the rail will depend on your height and reach, personal preference and the structure of the door frame or wall.

As a general rule the bottom fixing of a 450mm long vertical rail may be positioned 790mm above the internal floor.

Hand-rails for external steps

If the difference in height between the internal floor level and the external path level is over 360mm an external hand rail such as a ground to wall, or ground to ground handrail should be considered and may be used in combination with a wall-fixed grab rail.

The same measurements apply as for an internal bannister

Fixing of grab rails

Grab rails are only as strong as the wall to which they are fixed and the fixings that are used. Unfortunately many modern houses which were built as cost-effective, thermally efficient buildings do not have internal walls that are ideal for the installation of wall fixtures such as support rails. They must be fitted securely to walls, floors or ceilings which can bear the weight of a person repeatedly pulling or pushing on the rail. The rail, the wall and the fitting of one to the other MUST be strong and secure. Solid brick or block walls are best. If you cannot safely fit the rails, you will need to look at an alternative means of support, such as a frame around the toilet.

Permanently fixed rails

Most grab rails are permanently fixed in one position onto the wall, floor, ceiling, or a combination. When fitted securely and correctly they should be able to cope with the push/pull forces of repeated use.

Temporarily fixed rails

Suction grab rails attach to a smooth surface by forming a strong suction grip at each end. Some manufacturers state that they are not weight-bearing and are only intended to assist with balance. Others do not clearly state this, but give a weight limit for safe use. You are advised to read any guidance and seek further clarification if needed before you use these rails. They are highlighted as portable for visits and holidays.

When using these rails you must consider the integrity and strength of the surface to which you are fixing them. For example, when fixed to wall tiles, the attachment of the tiles to the wall MUST be secure.

If you have underfloor heating, or if you have a sealed/waterproof floor, such as in a wetroom, you should avoid fixing rails into the floor. You must also consider where any services, such as water/drainage pipes and electricity cables run inside the walls or under the floor. 

If you are unsure of the construction of your home, you should seek the advice of a builder. Many local authorities can provide information on local trusted handyperson schemes. They may also be able to advise you, and fit rails if suitable.

Traditional bricks and concrete blocks

Good quality traditional masonry and bricks should cause no problems if the recommended fixtures and procedures are followed. A plasterboard or tiled surface should not affect the fixing, although ensure that the whole depth of the fixing is supported by the masonry.

Most dense concrete blocks are strong enough to support rails. However, care should be taken as their composition may make it difficult to drill a straight hole through them.

Lightweight aerated and hollow bricks

If the wall is made of lightweight, aerated and hollow brickwork, even the most appropriate fixings may not be able to withstand the loads which can be suddenly applied to rails and hinged arm supports.

The insides of the hollow blocks are often filled with a polystyrene type insulating material which will not provide enough support for fixtures screwed into it.

Similarly, aerated concrete blocks, which are often used in bathrooms and toilets as the waste pipes are carried through their cavities, are made of a very lightweight substance which limits their fixing support qualities. Supporting fixtures should be attached to this type of wall using specific wall mounted support products or battens.

Partition and stud walls

Even if a partition or stud wall is physically strong and stable and has a suitable flat surface to take a grab rail, the addition of a pattress or backboard on the wall is advised when fixing a grab rail to it.

This should be a flat, unknotted piece of wood, which is screwed into the vertical joining pieces of the partitions. The grab rails can then be attached to the board. The College of Occupational Therapists recommends a 144mm x 19mm board/pattress with its external corners well rounded and the board itself fixed to the wall at least every 900mm (COT 2006).

Particular care should be taken when attaching rails to domestic sandwich partitions, e.g. plasterboard with a hardboard facing.

Fixing to UPVC plastic door frames should be avoided as the frames are unlikely to have the necessary internal materials in the required area to support a grab rail's fixings.

When rails are installed outside or in a bathroom and are likely to become wet consider using brass or chromium-plated screws to avoid the formation of unsightly rust stains.


Electrics and grab rails

When installing a grab rail the installer should ensure there is no possibility that any metal part which may be touched by you, including fixing screws, will come into contact with electric cabling.

Identifying your needs

Consider your daily routine. What movements are you making or what activities are you doing when you feel that additional support, or something to hold on to, would give you extra safety? For example:

  • getting in and out of the bath, or stepping into or standing in a shower
  • sitting down or standing up from the toilet, or standing to manage your clothes when using a toilet
  • standing by your front door to unlock it and then stepping up and over the threshold
  • going up and down the stairs.

Next consider your ability to grip onto a grab rail. Do you have reasonable hand strength? Do you ever have pain in your hands, wrists, elbows or shoulders which would prevent you from pulling up or pushing down on a grab rail? What is your overall balance and ability to stand like?

Consider the advice about the different kinds of grab rails. Identify the best types of rail for your particular requirements.

If you are very unstable when standing and you find it difficult to bear your own weight, simple grab rails may not be the most suitable answer for you. You may need more support to help you. Likewise, if you have very poor grip, or significant pain in your hands, arms or shoulders. 

If you are unsure about the best way to maintain your safety and independence, you are advised to seek a formal assessment of your needs from your local authority, or from a private/independent occupational therapist.

Health and social care needs assessment

If you are struggling with caring for yourself, or your carer is struggling to provide care for you, consider asking for a health and social care needs assessment. Since the Care Act 2014 (Great Britain. Parliament 2014) came into power in April 2015, anyone who appears to need care and support can request an assessment from their local council, irrespective of their income or savings. The Act also places a statutory duty on local authorities and the NHS to support individuals to take steps to prevent their ill health or care requirements from getting worse. These strategies for prevention can include the early provision of equipment and services to help prevent, delay or reduce the development of further need for care and support, which would include the provision and fitting of grab rails depending on the cost.

The care and support assessment aims to identify any difficulties you may be having in caring for yourself and how this impacts upon your wellbeing. If you have someone who helps you, they can have a carer’s assessment to see if they also need support to continue in their caring role.


Support us by donating

Need to speak to us?
back to top